5 Affordable Summer Activities for Children

By Sheila Buck

Parents sometimes find it hard to keep their children occupied during the summer months. Many summer camps and other programs cost money that families may not have. The following are some ideas for summer activities that are affordable, and the children will have fun doing them.

  • Summer camp is an activity that most kids want to participate in. These types of camps can sometimes cost a few hundred to more than a thousand dollars. They are still worth looking into because some summer camps offer reduced rates or scholarships if the family meets the income guidelines.
  • Some areas offer summer recreation programs for free. Children are able to enjoy socializing with other kids from the neighborhood as well as crafts, swimming and other fun activities. The school sometimes sends home notices about summer recreation programs. The town or city hall may also know of such programs. You can also check with the library.
  • Your child’s school may have a summer reading program for him or her to participate in. If your son or daughter loves to read, this is a good program to look into. There is often a certificate or prize awarded for program completion.
  • A trip to the local playground is always fun. Your child will be able to play with other children. Have your child pack a lunch and have a picnic. Some of the local playgrounds may have a sprinkler or pool. If so, be sure your child brings a towel and change of clothes in order to get wet.
  • If your child is seeking a good time with friends, but doesn’t want to leave the house, allow for camping in the back yard. Set up a tent and let your child invite some friends over for a camp out. Make sure they have plenty of blankets in case it gets cold. Let them make sandwiches and other snacks for them to have on hand. They can tell ghost stories and have a good time.

There are many ways to keep your children busy through the summer months. With a little searching, summer camp may be an option. If it’s not, brainstorm with your child to help find fun and creative ways to stay busy, that are also affordable.

*********************************************************

Sheila Buck is the single mom of two teenage boys. She has a Bachelor’s Degree in Clinical Psychology. Sheila is a freelance writer, and also writes books and short stories in her spare time. Sheila also writes for Frugal Recipes: Spending Less to Eat Healthy.

Make It A Happy Mother’s Day + A Gift Idea

I’ve been putting this post off for a while now, knowing it was going to have to happen even if I didn’t get to see my mom on Mother’s Day. And I don’t. I think a lot of people won’t be seeing their mom’s on her special day. 😦 Or even close to that day. I feel for you. And for her.

I even thought about not making the post at all, but I had a product I was supposed to try and mention – if I liked it. I tried it. It helps my pain situation. So I am mentioning it below. I am not being paid to mention it, though I did receive some samples to try.

I’m not seeing my mom. I haven’t been able to go shopping myself for just over a month, so I only have one little thing I am even going to be giving her when I finally do get to see her. This product will also be mentioned below, in the description of the “gift” I put together for the purposes blog post.

But I’m sure many people haven’t gotten to do their personal shopping for their moms, and may not get to before Sunday, so I wanted to write about other ways we can show our mom’s the love this coming weekend. And throughout this entire ordeal we are all trying to get through.

What do you do when you cannot see your mom, or others who are important to you? Here are just a few ideas:

  • My mom and I talk on the phone about every other day. When mom and I talk, it is for anywhere from 30 minutes to 2 hours. She and my sister talk every day, sometime twice. I’m not sure how long they talk each time.
  • Keep up with each other on her favorite social media venue. There, you can share pictures, useful articles, and other things.
  • Do a video chat. I’ve done this with my daughter Zowie and my grandchildren. I love seeing their faces and hearing their voices.
  • My daughter Skye does my shopping for me every couple of weeks. We’ve talked across the yard. Me on the doorstep, her at her car.

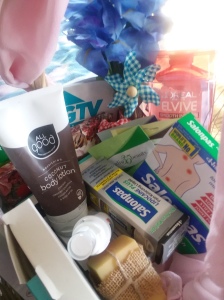
Now, the example gift here is not the gift I got my mom. It really is just an example of a special thing to do for your mom if you have the opportunity to do it. The gift basket has some of my favorite things.

What I might do for my mom is to go shopping, looking at things that I know she would love. I would think about her personal style, the brands she loves, the scents she adores, her hobbies, and other things that are important for her.

This is a basket my daughters could throw together for me, if I didn’t already have these things – haha – that I would love. This would make me feel absolutely pampered. And I looove feeling pampered!

NOTE: I am an affiliate for Mighty Nest because I love their products. This means I buy from them and use what I buy regularly. I believe in them. There is an affiliate link leading to their site below. I do get a little monetary reward if you purchase from them through this link. Thank you.

Gift Basket
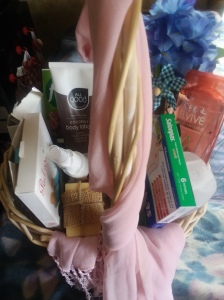
A basket is a gift itself. This particular basket actually holds my correspondence items and bill-paying binder. The pink scarf wrapped loosely around the handle and draped over the side of the basket was given to me as a Yule gift by Skye. The All Good body lotion smells amazing, and is coconut scented. It smells sooo good.

Soaps from local farmer’s, often sold at farmer’s markets and made from goats milk and other good for your skin products, come simply wrapped and also smell amazing. They allow you to take wonderful care of your skin. I think most moms would like a bar or two to use on their face.

20200506_143637I find that, especially during the winter, my skin is especially dry, so products that will help me to care better for my skin are always a plus. I love spa gel socks and gloves. I load my feet and hands up with lotion, put on the gloves and socks, and relax while watching a sitcom. When the sitcom is over, I take them off, and work the remaining lotion into my hands and feet. This makes my skin super soft.

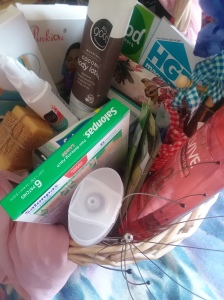
All Good, which I obtained from Mighty Nest, also has a freezing herbal pain reliever that I use on my back. I can’t actually reach the part of my back that causes me so much grief, so this spray helps me to lessen the pain in that area.

20200506_143649Another pain aid is Salonpas, which comes in patches, sprays, and roll-on’s. I used this when I first got it, on my hip which I have some soreness issues with. As moms get older, we do have aches and pains, so sometimes pain aids are necessary. The Salonpas product I tried for my hip was the large pain relieving patch. It is for temporary aches and pains, and smells like menthol. It did work like a charm. NOTE: Talk with your doctor before taking pain medications, and find out from your mom what her doctor is recommending for pain, especially during this time of the Coronavirus. There may be some things you should not be taking right now. It is always best to talk to your doctor.

I love flowers, as do many moms. A vase with flowers will look good on a stand, or on the table. My vase has a red gingham ribbon tied around it, and I’ve stuck a little pinwheel in the vase because pinwheels remind me of spring and summer.

20200506_143709
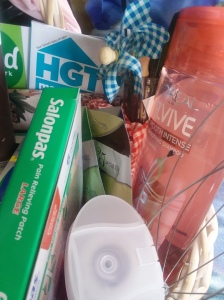
Two magazines I’ve been enjoying lately, and actually have subscriptions to, are the ones for HGTV and the Food Network. Thinking about what your mom’s interests are, and knowing what she already gets in the mail or buys when she is out, will help you to decide what to get her. You’ll want to go for something she doesn’t usually read, but she is interested in. (My mom is actually going to get these, and the last few month’s of each magazine’s issues, but not as her Mother’s Day gift because they are already my magazines. We share magazines in my family.)


Facial masks are another thing I like. My favorites are peel-offs, but I use other types as well. I also love shampoos and body washes. This time of year, I really want ones that remind me of spring scents.

20200506_160222I also love the head massager that I won at a work party. It is amazing. If your mom doesn’t have one, she should.

Other great things to add might be a stationary set, and a journal along with your moms favorite type of pen.

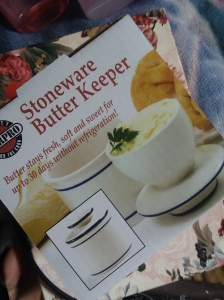
And this butter keeper is the gift I actually did get for my mom. She knows already, so I can mention it here. I can’t see her, and we have discussed why I got it for her and why.

You see, I was visiting one day a few months back when I hadn’t had a chance to have breakfast first. I decided I’d have toast at her place. Both of us preferring butter, she took a stick out of the refrigerator and apologized for how hard it was. I was fine with it, slicing some thinly to cover my toast when spread out. The toast melted it just enough to facilitate this.

We talked about how much she hates leaving the butter on the counter because the butter gets far too soft. Since I don’t really buy or make bread to eat at home because of my diet choices, I had forgotten about the problem. We talked minimally, wondering if buying a crock would be worth it.

I found this little crock, which is probably going to hold exactly one stick of butter, for about $5.00, and had decided to put it in with the rest of what I wanted to get her for Mother’s Day. Now, since I am not going to be able to shop, this is going to be the extent of her gift. There is a story behind the purchase of the gift, and this is what makes it special.

Happy Mother’s Day! To all the mom’s who may or may not be “visiting” with their children and grandchildren this year. I wish you all the best, and all the love you can handle.

~ Shannon


Celebrating Earth Day

I like to think that most frugal-minded families are already doing things that will allow them to tread more lightly upon our beautiful green Earth. I may be wrong. Well, some of us are at any rate 🙂

If you’re one who is not doing so as of yet, you may want to start. Not only will you be helping the environment, but you will be saving much money for either your household or someone else’s. Either way, all is good. Here are some steps to get you started:

  1. Reuse items within the family. Save hand-me-down clothing, toys, furniture and other items until you know that you will never use them again.
  2. Accept everything from people who want to give you their cast-offs. Create a storage system for anything that you will keep for later use. Give away the rest. Or hold a yard sale.
  3. Have children do crafts reusing every day items such as cardboard tubes, old light bulbs and baskets of all sizes.
  4. Purchase a shower head that allows you to easily flip a switch to stop water flow while lathering up.
  5. Start an herb garden in the living room window, or out in the yard.
  6. Use the Earth Day ideas from the Frugal Recipes site.
  7. Walk whenever possible, rather than drive.
  8. Fix things rather than purchase new.
  9. Make your own homemade cleaning products, using non toxic products.
  10. Reuse torn clothing as rags, or in quilting. Consider making a rag rug as well.

5 Affordable Spring Activities for Children

By Sheila Buck

When winter is over and spring arrives, there are new activities for your child to enjoy. When the snow has melted and the ground dries up your son or daughter may want to start spending more time outside. Here are a few ideas to keep your children busy during the spring season.

  • Sports at school have changed again so, if your child is athletic, he or she may want to try another sport.
  • Help you child start a vegetable or flower garden. Show them how to prepare the area and plant the seeds. Some plants may need to be planted inside and taken care of until they are big enough to go out into the garden. When the garden is all planted, your son or daughter can weed and water the when needed. Your child will enjoy the fresh vegetables, or beautiful flowers, that come from taking care of their own garden.
  • When fishing season starts, children can have fun fishing with their friends. Fishing supplies can be bought at a fairly inexpensive price at your local department store. Even if you have to spend a little more money for a decent fishing pole, the fish your child brings home can help with food expenses and even things out. Have your child pack a lunch so he or she can picnic with friends.
  • Dig out the bikes that have been put away all winter. Biking with friends is always fun, and great exercise too. Again, if your child packs a lunch he or she can picnic with friends.
  • Allow your child to have friends over for the day. Give them chalk and let them draw in the driveway. Hopscotch is a game that is fun to play. Have them play with the other outdoor toys that you had put away for the winter. Jump ropes and hula hoops are wonderful outdoor toys for children to play with. Make them sandwiches, chips and juice for lunch, and lay out a blanket on the lawn for them to sit on while they eat.

There are plenty of activities for a child to participate in on a warm spring day. Most are more fun if there is company, so allow your child to invite a  friend. On warm days, always make sure your son or daughter has plenty of water and, even though it’s spring, sunscreen is a good idea.

*******************************************************************

Sheila Buck is the single mom of two teenage boys. She has a Bachelor’s Degree in Clinical Psychology. Sheila is a freelance writer, and also writes books and short stories in her spare time. Sheila also writes for Frugal Recipes: Spending Less to Eat healthy.

Family Day at the Park

A park is a great place to have a family fun day. Take advantage of these free spaces to visit whenever you have the chance. Enjoy the scenery and have fun as a family.

If you are looking to make a trip to the park enjoyable for your family, there are plenty of things to do that won’t cost anything extra. To get you started, why not try some of these:

  • Pack a picnic lunch, extra water, snacks, and other items you will need, such as sunblock, towels and bathing suits if there is a water feature and the days are warm enough, a blanket or two, a Frisbee, and sports equipment.
  • If allowed, bring fishing poles and tackle boxes.
  • Bring your camera so you can take photos for the family album. Let children join in the fun of photographing what they think is important.
  • Have the children hang out in the playground area during the morning, while you sit nearby and read or socialize with other adults. (If the children are big enough to be left to their own defenses. Otherwise, join them on the playground. You may wish to regardless.)
  • Morning is a good time for children to use the park’s water features as well.
  • Set up the picnic lunch and call the children over. Connect with your children about what you’ll all be doing for the rest of the day, and about what is going on in their lives and yours. Discuss upcoming family events, and anything else they should know about. Be silly with them, and answer questions they may have.
  • Frisbee and catch are both great after lunch games you can enjoy with the children. Consider a walk through the park, or sitting on the rocks by the river. This should be a fun time spent together as a family.

These park days are wonderful ways to strengthen family bonds. Allow your children to invite a friend along for even more fun. Inviting another family along is also an option. Just be sure that everyone is involved in the fun.

Outdoor Spring Activities to Enjoy with Children

Being outside is great for the entire family. The fresh air, the extra activity, and the chance to explore, are important for everyone. Watching children flourish while being outside is a heart-warming experience for parents and other caregivers. And sharing the experiences of enjoying fun activities together aids in building strong bonds.

Enjoy A Nature Walk

A morning or evening walk is a great way for everyone to stretch their legs.  Point out things you notice are happening around you and talk with your children about them. Notice animals and birds, and listen to nature sounds for a few minutes.

Give each child a pencil and a journal to record their findings, stopping at least once during the walk to allow them to add entries to it. Have them date each new entry, and maybe add the location, so they can look back over things later.

Enjoy A Picnic Together

Children have so much fun in the kitchen, so let them help to prepare the food for a picnic in the park, or out in the yard. They can make simple sandwiches, place precut vegetables into baggies, and fill water bottles.

Picnics are a great time for chit-chat, and then for some play. Bring a Frisbee, or baseball gloves and a ball to toss back and forth.

Begin A Compost Pile

A good way to teach children how not to be wasteful is by starting and caring for a compost bin. They will also learn about other important things while doing this.

Decide where you want the pile, and have the children spread some straw or dried leaves over the area. Let them shovel a few bags of soil over this dry matter, while explaining the types of waste that will be composted. Have a bucket or two of food scraps ready to be added as well.

Use a long stick or broom handle to show them how to mix the food into the soil, and explain that this action adds oxygen to the soil and will help the compost to break down more quickly.

After each meal, one child can take a bucket of scraps out to the pile and mix it in with the existing soil. By autumn or the next spring, you will be able to use the compost in a garden.

Plant A Garden

Gardening in the spring is a good way to get back into the routine of exercise after having been cooped up over the winter, for children and adults.

Place a raised bed where you want a garden located, and allow the children to help you fill it with organic soil, perhaps from a compost pile. Help them to even the soil out when they are done, while explaining how they will be planting vegetables for use when preparing meals later in the year.

Use seedlings that were started from organic seeds, demonstrating to the children how to plant them properly and showing them how to space the seedlings correctly so the plants will have room to grow.

Spring Crafts Children Will Love

Easy craft projects allow children to successfully create decorations and gifts. The ideas below will provide children with the opportunity to celebrate spring, while making things they can gift to others, or decorations for your home.

Picture Flowers

Materials: Flower-shaped cookie cutter(s), pencil, scissors, pictures, wooden skewers, paper (plain or patterned), glue, a vase

Have your child use a pencil and a cookie cutter to trace flower-head shapes onto paper. Ask him/her to cut out 2 shapes for each flower they wish to make. Provide him/her with small pictures of themselves or others that you have cut into circles to fit the center of each flower, and have your child glue these onto their flowers. Have him/or glue a wooden skewer to the backs of half of the flowers, then to glue the other half of the flowers to the backs of these and set aside to dry.

Once the flowers are dry, allow him/her to create an arrangement in a vase.

Glittery Planters

Materials: Glitter glue pens, a small planter, organic potting soil, seeds/seeding, water

Give your child a set of glitter glue pens, and a planter that has been washed and dried thoroughly. Ask him/her to create designs or spring scenes on the outside of the planter with the pens, and then set them aside to dry.

Once dry, have him/her fill the planters with soil and plant a seed or seedling in it. Have them add a little water and place it in a sunny window. Explain that water and sunlight are important to the plants but too much water will kill them, and ask them to only water the plants when they start to dry out. Explain the type of plant that was started and, if giving as a gift, let him/her watch it grow some first.

Tulips in a Vase

Materials: Egg cartons, scissors, paints in spring colors, paint brushes, pipe cleaners, vases, ribbon

Often, the first flowers we notice in the spring are tulips. Many people plant them around trees or in front of their homes. These vividly colored flowers bring happiness into the hearts of the people who most anxiously await the first signs of spring.

Cut the cups out of egg cartons, and cut each of these along the sides, 2/3 of the way down. Poke a hole in the bottom of each. Have your child paint with vibrant colors and some brushes, and allow the tulips to dry.

Once dry, have your child poke pipe cleaners up through the holes to form the stems, and place his/her tulips into vases. Then have him/her tie a bow around vase.

Painted Frames

Materials: Wooden picture frame, paint, paint brushes, photographs

Give your child a frame, minus the glass, inserts, and back, if possible. Have him/her paint the frame with spring-time things such as eggs, grass, flowers, and birds.

When dry give, him/her a photograph of him or her self, as well as the other frame parts, and demonstrate how to put the frame back together.

Is it Okay to Pick up Gifts at Yard Sales, Thrift Stores, Etc.?

I love yard sales, thrift shops, clearance sales, and flea markets. I always find gems when I visit, and save so much over the price of new-bought items. I am a frugalista at heart. How about you?

When buying from places such thrift shops and flea markets, you’re reusing other people’s stuff. This means that it is not going into a landfill, and someone local is earning money. Both are worthy reasons to buy items from these places.

But, should you buy gifts for other people at these places?

There are some that would say this is cheap. Maybe even tacky. They don’t want to receive something that was acquired this way, not even during a clearance sale.

I disagree. Especially when money is very tight. And no one has ever held it against me that their gift at least partly came from a yard sale.

Now don’t get me wrong. I’m not telling anyone to go out and buy just any gifts at these venues. Make sure the stuff is of good value, and well-kept. No one wants a ‘new’ comforter with holes or a huge stain. That would be wrong.

What I’m saying is that you check an item out real well and, if it is a quality item, get it. The stuff I get looks new, for the most part. Unless I’m specifically looking for items that are slightly worn because I’m doing theme gifts.

When my daughters were young we made a lot of food gifts for people, so certain things were bought at these venues each year including:

  • Baskets of various sizes.
  • Tins of various sizes.
  • Tissue paper, ribbons, bows.
  • Coffee mugs.
  • Assorted gift tags, and cards with envelopes.

One year, when Skye and Zowie were not very old, I bought most of their Christmas gifts at the local church thrift store. I was able to get them the most adorable clothes, and they loved each item. They didn’t care where the clothes came from, or how much was spent on them. The clothing looked almost new.

I bought so many books for them over the years from yard sales and flea markets; they hardly cost a thing. Games and puzzles, as well as stuffed animals and dolls.

So I’m going to say yes, it is okay to buy gifts at these venues if you need to. Or even if you don’t actually need to.

And clearance sales? Yup. Great buys right in the store. Far better than regular sale prices.

What do you think? Have you ever bought a gift for someone from one of these places? Tell us about it in the comments, or email me at shannonlbuck@gmail.com. I always reply!

Happy Shopping!

Shannon

(Originally published to frugalisfabulous.wordpress.com on 2/27/16. Still applies today.)

DIY: Easy Pencil Holder

We’ve been discussing how to organize your space in attractive ways, without breaking the bank. You’ve already been introduced to my ideas for creating labels, and now I want to explain an easy way to organize pencils and other things in your hobby room or home office.

These holders will organize pencils, pens, highlighter, markers, and more, allowing for display in a pleasing manner. Because they are so easy and affordable to make, you can have a separate holder for each group of items. A pencil holder will add charm to your workspace, especially when created to match the décor of the room.

Alternatively, a pencil holder can be made as a way to decorate your work space for a holiday or season.

Materials

Aluminum can, cleaned and dried, with a smooth edge
Tape measure
Paper cutter
Decorative edged scissors (optional)
Scrapbook paper, 2 colors
Adhesive
Stickers or other embellishments

  1. Choose paper colors to match the decor in the area where the holder will be used, or the occasion you’ll be celebrating. One sheet should be light, the other a medium to dark color.
  2. Measure the can height, and then measure around it. Add ¼ inch to the second number.
  3. Use the paper-cutter to measure and cut the light-colored sheet of paper to size.
  4. Glue this sheet of paper around the can by first gluing one end to the can, then overlapping the other end and gluing it in place.
  5. Allow to dry completely.
  6. Using the second number again, cut 2 pieces of dark-colored paper to a ½ inch height using the paper-cutter or decorative edged scissors.
  7. Adhere these to the top and bottom edges of the light-colored paper that was glued to the can, using the same method as above.
  8. Allow to dry thoroughly.
  9. Choose stickers and/or other embellishments to match your décor, an upcoming holiday, or the season.
  10. Look at the can and decide where you want to place each item.
  11. Adhere them in a flattering manner to the areas of your choice.
  12. Place the pencils or other items into the pencil holder, and place it on the desk.

Example: A spring-themed pencil holder may include stickers depicting grass, flowers, and the sun, or butterflies and dragonflies above a pond. An ocean theme would include sand, waves, and seashells.

Alternatively: Use patterned paper rather than embellishments, or paint decorations onto the paper.


DIY: Simple Drawer Labels

Are you working to get your hobby room, home office, or another area of your home  organized? For me, it’s the kitchen. An organized space is a tidy space, and provides easy access to whatever is needed.

If you are a scrapbooker or are into other paper crafts, you likely have paper scraps that you can use to make the labels with. Attach labels to boxes, binders, and more. I’m going to make mine for labeling the herbs I dry and put into jars.

You can make labels to put on a number of organizers, including baskets, photo boxes, file cabinets, hat boxes, plastic storage totes, and pencil boxes, that will allow you to organize each space in your home.

NOTE: You do not have to laminate these if you don’t want. Simply delete that item from the materials list, and leave out that step in the directions.

Materials

Measuring tape
Card stock
Paper cutter
Adhesive
Stickers and/or other embellishments
Markers in your choice of colors
Laminate

  1. Measure the front of the container you’ll be making the label for, to determine the size you want to make.
  2. Decide on a card stock size big enough to adhere a sticker or other embellishment to the front of, and that will allow you to write in letters big enough to be read easily.
  3. Choose a light-colored card stock to match the room the organizers will be placed in.
  4. Use a paper-cutter to measure and cut out however many labels you’ll need, in the size you want. Make sure the blade of the cutter is sharp enough so that the cuts are clean.
  5. Use a dark-colored card stock that will also go with the area as a background. Use the paper-cutter again, this time to measure and cut the card stock ¼ to 1/3 inches bigger around than the labels you just cut out.
  6. Glue the light-colored labels to the dark-colored backgrounds, making sure the labels are centered onto each of the darker-colored pieces of card stock.
  7. Allow these to dry thoroughly.
  8. Adhere a sticker or other embellishment to each card. Mix these up so you have some labels with an embellishment on either the left or the right, or keep them uniform by placing one on the same side of each label. Or place a small embellishment to each edge. Whatever you prefer.
  9. Choose a dark-colored marker, such as green, black, or blue, to finish the labels. Write the name of the item for each container on its’ corresponding label. Use clear print or script, so the labels are easy to read.
  10. Cut two pieces of laminate for each label. Cover the front of each with one piece, and adhere the second piece to the back, so the edges stick together. Trim around the edges of the laminate to be sure everything is even.
  11. Adhere a label to each drawer with tape or another adhesive.